From AWS Console:
A VPC is an isolated portion of the AWS Cloud populated by AWS objects, such as Amazon EC2 instances.
VPCs are logically isolated networks, they cannot communicate to the Internet or to each other without explicitly granting that capability => security first principle.
Each account in each region comes with default VPC. A default VPC comes with:
- public subnet in each Availability Zone
- internet gateway
- settings to enable DNS resolution.
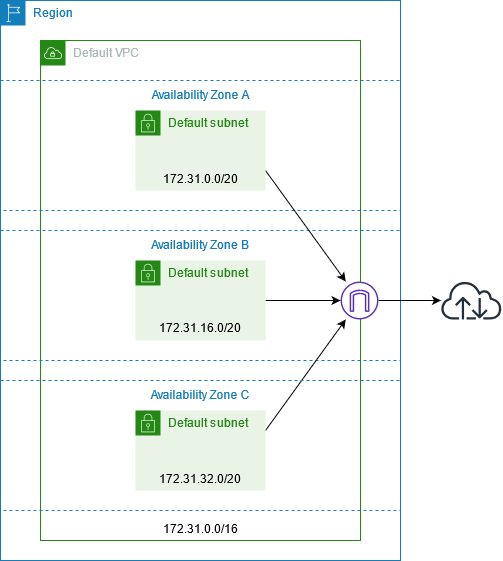 |
| source: https://docs.aws.amazon.com/vpc/latest/userguide/default-vpc.html |
VPCs are created per account, per region. VPC spans a single region.
With that region it can use all availability zones (AZ) => high availability, fault tolerance, resilience
For applications running on EC2 architecture starts with network.
We can connect one VPC to another, which is called peering. We can enable communication between them as if they are part of the same network.
VPC can connect to Internet or remote office, via VPN.
AWS soft limits:
- 5 VPCs per region
- 200 subnets per VPC
VPCs within the same region can have overlapping ranges. E.g. in eu-west-1 (Ireland) we can have two VPCs with ranges 10.3.0.0/16 and 10.3.0.0/21. The drawback of overlapping ranges is that these VPC can't be peered.
AWS best practice recommends leverage multiple VPCs. For example, by environments: VPC for Development resources, Testing resources in another VPC, Production its own VPC. Or, per function: shared services are on their own VPC, App1 has its VPC and App2 its VPC. Division per department: Finance VPC, Engineering VPC, Business Unit X's VPC.
If you're already using multiple accounts across multiple regions, then each user in each region by default has its own VPC.
Default VPC
 |
| Finding a VPC service in AWS Console |
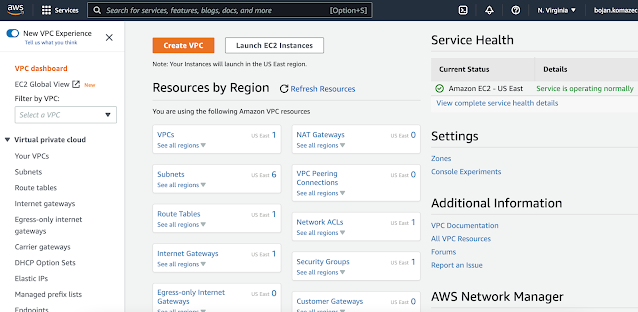 |
| VPC Service Dashboard |
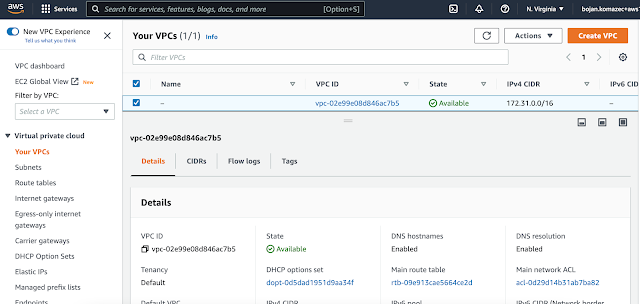 |
| Default VPC is listed |
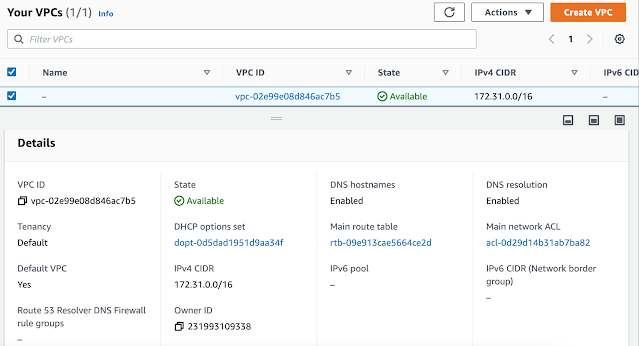 |
| Default VPC details |
In AWS, each default VPC has CIDR 172.31.0.0/16.
Each VPC, and so a default one, has a main route table associated with it.
Default VPC can be deleted.
Network ACLs can be set so Default VPC is isolated (cut out).
Users can be denied access to default VPC by removing the access to it in their roles.
{
"Version": "2012-10-17",
"Statement": [
{
"Effect": "Deny",
"Action": "ec2:RunInstances",
"Resource": [
"arn:aws:ec2:*:*:subnet/*"
],
"Condition": {
"StringEquals": {
"ec2:Vpc": [
"arn:aws:ec2:us-east-1:123456789012:vpc/vpc-xxxxxx"
]
}
}
}
]
}
From AWS console documentation:
You must specify an IPv4 address range when you create a VPC. Specify the IPv4 address range as a Classless Inter-Domain Routing (CIDR) block; for example, 10.0.0.0/16. You cannot specify an IPv4 CIDR block larger than /16. Optionally, you can also associate an IPv6 CIDR block with the VPC.
Microservices, EC2 container service, clustered service and load balancers that need to communicate with NoSQL Data Stores like Cassandra or MongoDB. In order to get access to extra layers of security with routing, we want to put these services in their own VPCs. NoSQL DBs should not be accessed from the Internet => they should be put in their own VPC without an Internet gateway. Container services and load balancer should be put in their VPCs with Internet gateway.
Name can be e.g. microservices. IPv4 CIDR block requires some thought about:
- ranges that we might use in other regions
- ranges that we might use in future with on-premises or co-location
- anticipation how big our network needs to be - we don't want to create a VPC with allocated thousands of IP addresses if we'll have several hundreds machines in it. In the same way, we don't want to allocate too few IP addresses as if we want to scale e.g. EC2 instances and load balancers in VPC network, we won't be able to launch new EC2 instances as there won't be enough IP addresses.
if we want these networks to be able to communicate to each other either via peering or VPN then we cannot have ranges that overlap.
Microservices - multiple clusters of microservices. We can say we want to have 3 different subnets of couple of hundreds of IP addresses, with each subnet not having access to the Internet.
Multiple load balancers. Load balancers need access to the Internet. We can say we want to have 3 different subnets of couple of hundreds of IP addresses, with each subnet having access to the Internet.
We want these clusters and load balancers to scale.
We need ~2000 IP addresses for entire VPC.
10.0.0.0/21
00001010.00000000.00000000.00000000 = 10.0.0.0 (min value in the range)
00001010.00000000.00000 | 000.00000000 <-- left of separator are frozen bits
00001010.00000000.00000 | 111.11111111 = 10.0.7.255 (max value in the range)
Publicly available, load balancers publicly available.
Enable Amazon provided IPv6 CIDR blocks.
Ideally, the process of provisioning VPC should be automated (by using a Terraform for example).
VPC for NoSQL datastores. Kassandra, MongoDB, relational DBs, elasticcache hosted memcache or Redis clusters.
datastores VPC IP range and the range we chose for microservices VPC do not need to be contiguous.
HOw many nodes will be in this VPC?
3 or 4 clusters of Kassandra nodes, each with 6 nodes => we don't need large number of IP addresses
If we want to be contiguous:
10.0.8.0/23
Cassandra uses IPv4 so we don't need IPv6 => check "No IPv6 CIDR block"
Subnets
EC2 can't be directly launched in VPC. EC2 instances are launched in subnets.
Subnets are logically dividing VPC into different ranges, for different purposes.
VPC spans the entire region e.g. VPC 10.2.0.0/16 us-west-2.
Subnet is created for particular availability zone.
us-west-2a: subnet 10.2.0.0/24
us-west-2b: subnet 10.2.1.0/24
us-west-2c: subnet 10.2.2.0/28 <-- smaller subnet, for relational databases
When we create a subnet, Amazon VPC will reserve 5 IP addresses out of every subnet. The fist four and the last one.
Example: in 10.2.0.0/24 subnet, these reserved IP addresses will be:
10.2.0.0
10.2.0.1 - reserved for VPC router
10.2.0.2
10.2.0.3
10.2.0.255 - broadcast (unused as Amazon VPC does not support broadcast)
So /24 gives 251 usable IP addresses.
Each subnet has the following properties:
- ID
- ARN
- State e.g. Available
- CIDR e.g. 172.31.16.0/20
- Number of Available IPv4 addresses (this depends on CIDR mask e.g. if it's 20 number of available addresses is 2^(32-20) = 2^12 = 4096)
- IPv6 CIDR
- Availability Zone e.g. eu-west-2a (Subnets are AZ-specific!)
- VPC that it belongs to
- Route table
- Network ACL
- Default subnet (Yes/No)
- Auto-assign public IPv4 address (Yes/No). Enable AWS to automatically assign a public IPv4 or IPv6 address to a new primary network interface for an (EC2) instance in this subnet.
- By default, nondefault subnets have the IPv4 public addressing attribute set to false, and default subnets have this attribute set to true. An exception is a nondefault subnet created by the Amazon EC2 launch instance wizard — the wizard sets the attribute to true.
- Auto-assign IPv6 address
- Auto-assign customer-owned IPv4 address
- IPv6-only (Yes/No)
- Hostname type e.g. IP name
- Resource name DNS A record (Enabled/Disabled)
- Resource name DNS AAAA record (Enabled/Disabled)
- DNS64 (Enabled/Disabled)
- Owner (account ID)
Creating Subnets
We need to have at least one subnet in order to be able to launch EC2 instances or create elastic load balancers.
VPC should be divided into subnets in order to achieve high availability, fault tolerance and resilience to the loss of a data center.
VPC is divided into subnets per tier (e.g. front-end, business logic, DB), per availability zone (AZ).
Example: microservices VPC will have two tiers:
- public for load balancers
- private for container clusters
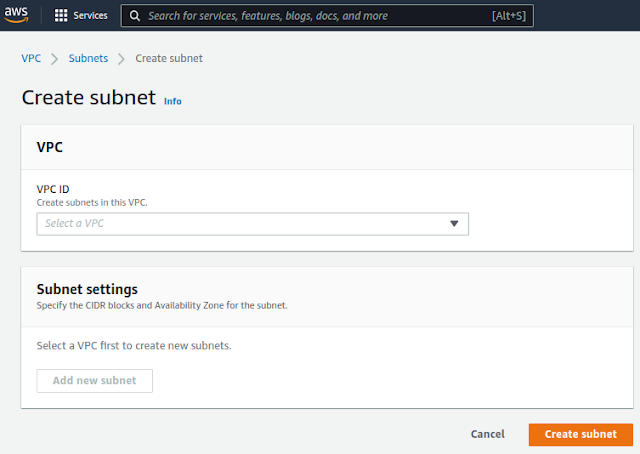 |
Default view of the Create subnet dialog
|
After we select the parent VPC, we get more options:
For AZ we want to choose region's a zone, in our case eu-west-1a.
Name subnets according to functional purpose and according to the availability
zone that they reside in. As we're going to create a public subnet we're going to
name this one public-a.
CIDR block of the subnet should be a subset of the CIDR block of the parent VPC. In our case parent VPC has CIDR 10.10.0.0/16 so the subnets could be e.g. 10.10.0.0/24, 10.10.1.0/24, 10.10.2.0/24 etc...If we choose 10.10.0.0/24 this will give 251 usable public IP addresses which gives enough room for load balancers to scale without running out of IP addresses.
For the next subnet we can choose:
- Name: public-b
- AZ: eu-west-1b
- CIDR block: 10.10.1.0/24 (if we want to choose the block that is following the previously chosen 10.10.0.0/24)
And for the subnet for the last AZ:
- Name: public-c
- AZ: eu-west-1c
- CIDR block: 10.10.2.0/24 (if we want to choose the block that is following the previously chosen 10.10.1.0/24)
These public subnets need to be routed to the Internet.
For our application servers, for container clusters, we want to create private subnets:
- Name: private-cluster-[a|b|c]
- AZ: eu-west-1[a|b|c]
- CIDR block: 10.10.[3|4|5].0/24 (if we want to choose the block that is following the previously chosen; we use /24 assuming that 251 IP address will be enough for cluster scaling)
We created a subnet for each tier, in each AZ so in total we have 6 subnets.
To change the name of the subnet in AWS console: go to the list of subnets and click on edit icon in the Name column as in the image below:
It is not possible to change or modify the IP address range (CIDR) of an existing virtual private cloud (VPC) or subnet.
Routing
Routing is a way of allowing traffic to flow from one network to another network or even within the same network. It's only once you have traffic routed from one place to another that you can then, filter the traffic that passes through it.
Routing (IP Routing) works on network OSI layer ans therefore it works with IP addresses only. It is not concerned with protocols (e.g. TCP, UDP, ICMP...) or ports(e.g. 80, 22, 443...) but with whether or not traffic can flow from one place to another.
VPC has an implicit router, and you use route tables to control where network traffic is directed. Each subnet in your VPC must be associated with a route table, which controls the routing for the subnet (subnet route table). You can explicitly associate a subnet with a particular route table. Otherwise, the subnet is implicitly associated with the main route table. A subnet can only be associated with one route table at a time, but you can associate multiple subnets with the same subnet route table.
(source: Configure route tables - Amazon Virtual Private Cloud)
Route table
A route table contains a set of rules, called routes, that are used to determine where network traffic from your subnet or gateway is directed.
Every VPC has to have at least one route table. Route table contains routes, sources of traffic and destinations where the traffic gets routed to. When we create VPC, it has a built-in router and a default route table (which has a default route).
Example: VPC has a range 10.10.0.0/16 and 3 subnets: 10.10.0.0/24, 10.10.1.0/24 and 10.10.2.0/28.
In this example, all route tables have a default route, in this case, this route says that all traffic destined for this particular range, 10.2/16 will remain local.
So, in this case, when you have a range that equals the range of the VPC, then the target will be local. That essentially says, that traffic destined for another address in this same range will remain local to that VPC. That default route table is set to what we call the main route table.
All subnets have to be essentially, in some way, associated with a route table. In this case, our main route table is implicitly associated with all of our subnets and it's through that, that the VPC is able to know how to route traffic between these subnets or from the VPC to the internet or from the VPC to a VPN connection or to another VPC. So, if we don't explicitly associate the subnet with a route table, then that subnet is implicitly associated with the main route table. So, the main route table is very important to keep in mind because generally, I like to keep the main route table only for use with private routing because if I were to create a new subnet, here, then that new subnet, until it's explicitly associated with a route table it will be again, implicitly associated with the main route table. So, in that regard, I typically like for new subnets to always fall back to remaining private rather than being accessible to and from the internet. So, again, routing is the mechanism that controls the flow of traffic. It's not concerned with protocols and ports. It's only concerned with traffic flowing period. Yes, traffic can flow from here to here, from this network to that network or no, it can only flow internally. So, routing can be considered as our first line of defense. If traffic does not flow, if we don't have a pipe from our VPC to the internet, then we don't have to worry about our machines being reachable from the internet. So, again, routing is controlling the flow of traffic, all together.
Enabling Internet Access in VPC
By default, custom VPC has no access to Internet. When we create a VPC, its main route table will be created and associated with it. The only route in it will be:
Destination: 10.0.0.0/24 <-- VPC CIDR range
Target: local
In the above example "local" means the VPC router will send traffic in that cidr range to the local VPC. Specifically, it will send the traffic to the specific network interface that has the IP address specified and drop the packet if nothing in your VPC has that IP address.
Also worth noting, is the local rule can't be overridden. The VPC router will ALWAYS route local VPC traffic to the VPC (and specifically route directly to the correct interface without letting anything else in the VPC have the ability to sniff it). That rule is provided mostly as a For-your-awareness rule.
Internet Gateway
An internet gateway is a horizontally scaled, redundant, and highly available VPC component that enables communication between your VPC and the internet.
To use an internet gateway, attach it to your VPC and specify it as a target in your subnet route table for internet-routable IPv4 or IPv6 traffic. An internet gateway performs network address translation (NAT) for instances that have been assigned public IPv4 addresses.
An internet gateway enables resources in your public subnets (such as EC2 instances) to connect to the internet if the resource has a public IPv4 address or an IPv6 address. Similarly, resources on the internet can initiate a connection to resources in your subnet using the public IPv4 address or IPv6 address. For example, an internet gateway enables you to connect to an EC2 instance in AWS using your local computer.
An internet gateway provides a target in your VPC route tables for internet-routable traffic. For communication using IPv4, the internet gateway also performs network address translation (NAT).
To enable Internet access, we need to create Internet Gateway and associate it with VPC. Once this is done, we need to modify main route table so it contains the following routes:
Destination: 10.0.0.0/24 <-- VPC CIDR range
Target: local
Destination: 0.0.0.0/0 <-- any IP address
Target: igw-0b8425abd94c8322f <-- Internet Gateway id
If we have public subnets in our VPC, we can now associate them to this (main) route table (in its details, there is Subnet associations tab). After this, any resource (e.g. EC2 instance) running in public subnet can reach Internet.
NAT Gateway
You can use a network address translation (NAT) gateway to enable instances in a private subnet to connect to services outside your VPC but prevent such external services from initiating a connection with those instances. There are two types of NAT gateways: public and private.
A public NAT gateway enables instances in private subnets to connect to the internet but prevents them from receiving unsolicited inbound connections from the internet. You should associate an elastic IP address with a public NAT gateway and attach an internet gateway to the VPC containing it.
A private NAT gateway enables instances in private subnets to connect to other VPCs or your on-premises network but prevents any unsolicited inbound connections from outside your VPC. You can route traffic from the NAT gateway through a transit gateway or a virtual private gateway. Private NAT gateway traffic can't reach the internet.
Each NAT gateway has the following properties:
- Name
- Subnet in which it will be created (NAT gateway is subnet-specific)
- Connectivity type:
- Public
- Elastic IP allocation ID - we need to assign an Elastic IP address to the NAT gateway. BK: Elastic IP (public IP) must be attached to the Public NAT as subnet's property Auto-assign public IPv4 address applies only to EC2 instances in that subnet so even if it's set to true, NAT won't be assigned a public IP address.
- Private
- Tags
Elastic IP allocation ID
Choose an Elastic IP address to assign to your NAT gateway. Only Elastic IP addresses that are not associated with any resources are listed. By default, you can have up to 2 Elastic IP addresses per public NAT gateway. You can increase the limit by requesting a quota adjustment.
To use an Elastic IP address that is currently associated with another resource, you must first disassociate the address from the resource. Otherwise, if you do not have any Elastic IP addresses you can use, allocate one to your account.
When you assign an EIP to a public NAT gateway, the network border group of the EIP must match the network border group of the Availability Zone (AZ) that you're launching the public NAT gateway into. If it's not the same, the NAT gateway will fail to launch. You can see the network border group for the subnet's AZ by viewing the details of the subnet. Similarly, you can view the network border group of an EIP by viewing the details of the EIP address.
If we want to make EC2 instances running in private subnet to be able to reach the internet, we need to:
1) create NAT gateway in the public subnet, with Public connectivity
2) create another route table for this VPC, the one which will be associated with private subnets and which will contain the following routes:
Destination: 10.0.0.0/24 <-- VPC CIDR range
Target: local
Destination: 0.0.0.0/0 <-- any IP address
Target: nat-1a7625abd94c42aaa6 <-- NAT Gateway id
Only microservices VPC needs Internet access.
Internet access will be enabled for public subnets that we created (public-a, public-b and public-c).
1. Create Internet Gateway
Name: microservices-internet
2. Attach gateway to VPC
Internet Gateway is not yet attached to VPC, it's in detached state initially. We need to attach it to VPC that needs to have Internet access.
3. Create Route Table and Routes
Every VPC has to have a route table and each gets automatically a default one, the main route table. Routes in it keep traffic local, only within the VPC:
<image here>
We could use the main route table to enable the route for Internet access. But this is not a good idea from a security point of view as each new subnet will implicitly fall back to the main route table which means that each new subnet by default would have the Internet access (and will be accessible from the Internet) and this is not desirable.
We want to create a new route table.
Name: public-traffic
VPC: microservices (the one that needs Internet access)
Once created, it is not a main table and not associates with any subnets and it comes with default routes for local traffic.
In order to enable bidierctional Internet traffic, we need to add routes to Internet Gateway (one for IPv4 and one for IPv6)
<images>
4. Associate new Route Table with public subnets
Associate it with all public subnets
<images>
5. EC2 Instance to get public IP address
<images>
References:


