Wednesday 19 February 2020

How to install and use Boost C++ Libraries in CMake project on Ubuntu


Download Boost archive from Version 1.72.0 (that is the current version at the time of writing).

Go to the directory where you want to install Boost:

$ cd ~/dev

Unpack the downloaded archive (tar will create boost_1_72_0 directory):

$ tar --bzip2 -xf ~/Downloads/boost_1_72_0.tar.bz2 
$ ls
avast  boost_1_72_0  github  gnome  go  ssh-keys  vm  vm-shared

Let's see the content of ~/dev/boost_1_72_0/:

~/dev/boost_1_72_0$ ls -A1
boost
boost-build.jam
boostcpp.jam
boost.css
boost.png
bootstrap.bat
bootstrap.sh
doc
index.htm
index.html
INSTALL
Jamroot
libs
LICENSE_1_0.txt
more
README.md
rst.css
status
tools


Let's see the content of ~/dev/boost_1_72_0/boost/:

~/dev/boost_1_72_0/boost$ ls -A1
accumulators
algorithm
align
aligned_storage.hpp
align.hpp
any.hpp
archive
array.hpp
asio
asio.hpp
assert.hpp
assign
assign.hpp
atomic
atomic.hpp
beast
beast.hpp
...

lambda
...


Many Boost libraries are header-only which means we don't need to build them, it is only necessary to add relevant header in the source code and path to it to compiler (-I) options.

Boost documentation page Getting Started on Unix Variants contains a short demo code and I'm gonna use it here. It uses boost/lambda/lambda.hpp header from so let's see the content of ~/dev/boost_1_72_0/boost/lambda/ to confirm it's there:


~/dev/boost_1_72_0/boost/lambda$ ls -A1
algorithm.hpp
bind.hpp
casts.hpp
closures.hpp
construct.hpp
control_structures.hpp
core.hpp
detail
exceptions.hpp
if.hpp
lambda.hpp
loops.hpp
numeric.hpp
switch.hpp

Let's create a project in VSCode with following structure:

.vscode/tasks.json
build/
src/main.cpp
.gitignore
CMakeLists.txt


.vscode/tasks.json:

{
    // See https://go.microsoft.com/fwlink/?LinkId=733558
    // for the documentation about the tasks.json format
    "version": "2.0.0",
    "tasks": [
        {
            "type": "shell",
            "label": "CMake && make",
            "options": {
                "cwd": "${workspaceFolder}/build"
            },
            "command": "cmake make -DCMAKE_BUILD_TYPE=Debug .. && make -j 4",
            "group": {
                "kind": "build",
                "isDefault": true
            }
        }
    ]
}


src/main.cpp:

#include <boost/lambda/lambda.hpp>
#include <iostream>
#include <iterator>
#include <algorithm>

int main() {
    std::cout << "main()" << std::endl;

    using namespace boost::lambda;
    typedef std::istream_iterator<int> in;
    std::for_each(in(std::cin), in(), std::cout << (_1 * 3) << " " );

    return 0;
}


CMakeLists.txt:

cmake_minimum_required(VERSION 3.0)
project(boost-demo)
set(SOURCE src/main.cpp)
set(BOOST_ROOT "$HOME/dev/boost_1_72_0")
include_directories(include)
add_executable(${PROJECT_NAME} ${SOURCE})


Press CTRL+SHIFT+B in order to trigger building the project:


> Executing task: cmake make -DCMAKE_BUILD_TYPE=Debug .. && make -j 4 <

-- Configuring done
-- Generating done
-- Build files have been written to: /home/bojan/dev/github/boost-demo/build
Scanning dependencies of target boost-demo
[ 50%] Building CXX object CMakeFiles/boost-demo.dir/src/main.cpp.o
[100%] Linking CXX executable boost-demo
[100%] Built target boost-demo

Terminal will be reused by tasks, press any key to close it.


The output is an executable which we can run now:


~/dev/github/boost-demo$ ./build/boost-demo 
main()
1
3 2
6 3
9 4
12 7
21 ^C


The example above shows how it's simple to include Boost headers in C++ CMake project.

For some Boost features, we need to compile and install certain Boost libraries.


How to compile and install Boost binaries?


~/dev/boost_1_72_0$ ./bootstrap.sh --help
`./bootstrap.sh' prepares Boost for building on a few kinds of systems.

Usage: ./bootstrap.sh [OPTION]... 

Defaults for the options are specified in brackets.

Configuration:
  -h, --help                display this help and exit
  --with-bjam=BJAM          use existing Boost.Jam executable (bjam)
                            [automatically built]
  --with-toolset=TOOLSET    use specific Boost.Build toolset
                            [automatically detected]
  --show-libraries          show the set of libraries that require build
                            and installation steps (i.e., those libraries
                            that can be used with --with-libraries or
                            --without-libraries), then exit
  --with-libraries=list     build only a particular set of libraries,
                            describing using either a comma-separated list of
                            library names or "all"
                            [all]
  --without-libraries=list  build all libraries except the ones listed []
  --with-icu                enable Unicode/ICU support in Regex 
                            [automatically detected]
  --without-icu             disable Unicode/ICU support in Regex
  --with-icu=DIR            specify the root of the ICU library installation
                            and enable Unicode/ICU support in Regex
                            [automatically detected]
  --with-python=PYTHON      specify the Python executable [python]
  --with-python-root=DIR    specify the root of the Python installation
                            [automatically detected]
  --with-python-version=X.Y specify the Python version as X.Y
                            [automatically detected]

Installation directories:
  --prefix=PREFIX           install Boost into the given PREFIX
                            [/usr/local]
  --exec-prefix=EPREFIX     install Boost binaries into the given EPREFIX
                            [PREFIX]

More precise control over installation directories:
  --libdir=DIR              install libraries here [EPREFIX/lib]
  --includedir=DIR          install headers here [PREFIX/include]


To Be Continued...


References:


Building C++ application on Ubuntu with CMake, make and VSCode

This article shows how to set up building C++ project with CMake and make in VSCode on Ubuntu.

First make sure cmake and make are installed:

$ cmake --version
cmake version 3.10.2
CMake suite maintained and supported by Kitware (kitware.com/cmake).

$ make --version
GNU Make 4.1
Built for x86_64-pc-linux-gnu
Copyright (C) 1988-2014 Free Software Foundation, Inc.
Licence GPLv3+: GNU GPL version 3 or later <http://gnu.org/licenses/gpl.html>
This is free software: you are free to change and redistribute it.
There is NO WARRANTY, to the extent permitted by law.

Let's assume we have a C++ project with following structure:

build/
src/main.cpp
CMakeLists.txt

build is an empty directory; this is where the build output will be located.

src/main.cpp:

#include <iostream>

int main() {
    std::cout << "main()" << std::endl;
    return 0;
}


CMakeLists.txt:

cmake_minimum_required(VERSION 3.0)
project(cmake-demo)
set(SOURCE src/main.cpp)
add_executable(${PROJECT_NAME} ${SOURCE})


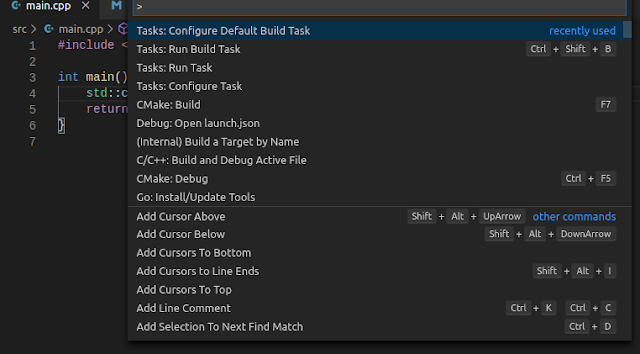
In VSCode, press CTRL+SHIFT+P or go to View >> Command Palette, select Tasks: Configure Default Build Task and then Create tasks.json file from template and then Other.

VSCode - Configure Default Build Task
VSCode - Command Palette


This will create ./.vscode/tasks.json with a sample task:

{
    // See https://go.microsoft.com/fwlink/?LinkId=733558
    // for the documentation about the tasks.json format
    "version": "2.0.0",
    "tasks": [
        {
            "label": "echo",
            "type": "shell",
            "command": "echo Hello"
        },
}

We can replace it with cmake and make toolchain:

{
    // See https://go.microsoft.com/fwlink/?LinkId=733558
    // for the documentation about the tasks.json format
    "version": "2.0.0",
    "tasks": [
        {
            "type": "shell",
            "label": "CMake && make",
            "options": {
                "cwd": "${workspaceFolder}/build"
            },
            "command": "cmake make -DCMAKE_BUILD_TYPE=Debug .. && make -j 4",
            "group": {
                "kind": "build",
                "isDefault": true
            }
        }
    ]
}

To build a project press CTRL+SHIFT+B or go to Terminal >> Run Build Task.

We'd get the output like this:

> Executing task: cmake make -DCMAKE_BUILD_TYPE=Debug .. && make -j 4 <

-- Configuring done
-- Generating done
-- Build files have been written to: /home/xxxxxxx/xx/xxx/cmake-demo/build
Scanning dependencies of target cmake-demo
[ 50%] Building CXX object CMakeFiles/cmake-demo.dir/src/main.cpp.o
[100%] Linking CXX executable cmake-demo
[100%] Built target cmake-demo

Terminal will be reused by tasks, press any key to close it.


To run the executable (build output):

$ ./build/cmake-demo 
main()

References:


What is a CMake generator? - Stack Overflow
Ubuntu Manpage: cmake-generators - CMake Generators Reference
cmake(1) — CMake 3.5.2 Documentation
Visual Studio Code Setup for Beginners using C++ and CMake
C++ Development using Visual Studio Code, CMake and LLDB
How to compile C++ code with VS Code, CMake and NMake - 40tude
GCC and Make - A Tutorial on how to compile, link and build C/C++ applications
c++ - How does CMake choose gcc and g++ for compiling? - Stack Overflow

Friday 14 February 2020

Running pgAdmin in Docker container

pgAdmin is a browser-based DB client. It is possible to run it from a Docker container  - an image is available at DockerHub: dpage/pgadmin4.

I assume we are also running PostgresDB Docker container.

To run pgAdmin Docker container on the same network as PostgresDB container execute:

$  docker run \
-p 5051:5051 \
-d \
-e "PGADMIN_DEFAULT_EMAIL=xxxxxxx@example.com" \
-e "PGADMIN_DEFAULT_PASSWORD=xxxxxxx" \
-e "PGADMIN_LISTEN_PORT=5051" \
--rm \
--name pgadmin \
--network my_network_default \
dpage/pgadmin4

my_network_default is the name of the Docker network on which Postgres DB container is running. This allows using DB service name (as specified in docker-compose.yml) as the DB hostname when adding DB server in pgAdmin4. This is possible if DB container is run via docker-compose.

Once this container is up we can go to http://localhost:5051 in local browser and log in with credentials specified via PGADMIN_DEFAULT_EMAIL and PGADMIN_DEFAULT_PASSWORD. To add a new DB server we need to know either its hostname or its IP address.

If both containers are running on the same Docker network (which is our case here as we use --network) then for DB container hostname we can simply use the name of the DB service from docker-compose.yml e.g. db.

If we want to go via DB container IP address route we can find it out we can inspect Postgres container network:

$ docker inspect my_network_default

If you're using VSCode for development, use Docker plugin feature NETWORKS, right-click network of interest and select inspect.

Resolving Issues


In case of any issues, remove -d from this command line in order to run this container undetached in which case all useful output will appear in terminal.

How to update pgAdmin Docker image? 


To update pgAdmin Docker image and then run it, use:

$ docker pull dpage/pgadmin4 && docker run (...) dpage/pgadmin4

How to Persist Data between pgAdmin sessions?


If we restart pgAdmin container, all serves we added before will be lost and we'll need to add them again. To prevent that we can use local host directory as a mounted volume for persistence:

$ docker run \
-p 5051:5051 \
-d \
-e "PGADMIN_DEFAULT_EMAIL=xxxxxxx@example.com" \
-e "PGADMIN_DEFAULT_PASSWORD=xxxxxxx" \
-e "PGADMIN_LISTEN_PORT=5051" \
--rm \
--name pgadmin \
--network my_network_default \
-v "$(pwd)/pgadmin_data/servers.json":/pgadmin4/servers.json \
-v "$(pwd)/pgadmin_data/pgadmin":/var/lib/pgadmin \
dpage/pgadmin4

It is not necessary to manually create local directory ./pgadmin_data/, it will be created by Docker but it will set both the owner and the group to root:

$ ls -la 
drwxr-xr-x  4 root  root  4096 Oct  7 16:39 pgadmin_data

From pgAdmin4 docs:

/var/lib/pgadmin - This is the working directory in which pgAdmin stores session data, user files, configuration files, and it’s configuration database. Mapping this directory onto the host machine gives you an easy way to maintain configuration between invocations of the container.
/pgadmin4/servers.json - If this file is mapped, server definitions found in it will be loaded at launch time. This allows connection information to be pre-loaded into the instance of pgAdmin in the container. Note that server definitions are only loaded on first launch, i.e. when the configuration database is created, and not on subsequent launches using the same configuration database.
pgAdmin runs as the pgadmin user (UID: 5050) in the pgadmin group (GID: 5050) in the container. You must ensure that all files are readable, and where necessary (e.g. the working/session directory) for this user on the host machine. 

As pgAdmin can't access directory owned by root, we need to change the ownership manually:

$ sudo chown -R 5050:5050 <host_directory>

or, in our case:

$ sudo chown -R 5050:5050 ./pgadmin_data/


After this, reload http://localhost:5051 and the login page should load with no issues.

I came across this pgadmin user issue when running pgAdmin from docker-compose. 

docker-compose.yml:

version: '3.7'

services:

  pg_db:
    image: postgres
    container_name: my-postgres
    volumes:
      - ./database_data:/var/lib/postgresql/data
    ports:
      - 5432:5432
    environment:
      POSTGRES_DB: $PGDATABASE
      POSTGRES_USER: $PGUSER
      POSTGRES_PASSWORD: $PGPASSWORD
    stdin_open: true
    tty: true

  pg_admin:
    image: dpage/pgadmin4
    container_name: my-pgadmin
    depends_on:
      - pg_db
    restart: always
    environment:
      PGADMIN_DEFAULT_EMAIL: test@example.com
      PGADMIN_DEFAULT_PASSWORD: postgres
      PGADMIN_LISTEN_PORT: 5052
    volumes:
      - ./pgadmin:/var/lib/pgadmin
    ports:
    - 5052:5052

docker-compose up output:

docker-compose up
...
my-pgadmin | WARNING: Failed to set ACL on the directory containing the configuration database:
my-pgadmin |            [Errno 1] Operation not permitted: '/var/lib/pgadmin'
my-pgadmin | HINT   : You may need to manually set the permissions on
my-pgadmin |          /var/lib/pgadmin to allow pgadmin to write to it.
my-pgadmin | ERROR  : Failed to create the directory /var/lib/pgadmin/sessions:
my-pgadmin |            [Errno 13] Permission denied: '/var/lib/pgadmin/sessions'
my-pgadmin | HINT   : Create the directory /var/lib/pgadmin/sessions, ensure it is writeable by
my-pgadmin |          'pgadmin', and try again, or, create a config_local.py file
my-pgadmin |          and override the SESSION_DB_PATH setting per
my-pgadmin |          https://www.pgadmin.org/docs/pgadmin4/4.26/config_py.html
my-pgadmin | sudo: setrlimit(RLIMIT_CORE): Operation not permitted
my-pgadmin | [2021-04-19 15:26:59 +0000] [1] [INFO] Starting gunicorn 19.9.0
my-pgadmin | [2021-04-19 15:26:59 +0000] [1] [INFO] Listening at: http://[::]:5052 (1)
my-pgadmin | [2021-04-19 15:26:59 +0000] [1] [INFO] Using worker: threads
my-pgadmin | /usr/local/lib/python3.8/os.py:1023: RuntimeWarning: line buffering (buffering=1) isn't supported in binary mode, the default buffer size will be used
my-pgadmin |   return io.open(fd, *args, **kwargs)
my-pgadmin | [2021-04-19 15:26:59 +0000] [89] [INFO] Booting worker with pid: 89
...


$ sudo chown -R 5050:5050 ./pgadmin/
$ ls -la  ./pgadmin/
total 8
drwxr-xr-x 2  5050  5050 4096 Apr 19 16:26 .
drwxrwxr-x 7 bojan bojan 4096 Apr 19 16:26 ..


How to export and view exported table?


If we export some table into a csv file, we can see that the following command is executed:

This command is run when using pgAdmin web application to export DB table my_table to csv file:

"/usr/local/pgsql-11/psql" --command " "\\copy public.my_table (column1_name, column2_name...) TO '<STORAGE_DIR>/my_table.csv' CSV QUOTE '\"' ESCAPE '''';""

STORAGE_DIR path is defined in /pgadmin4/config.py.

We can view csv file it if we attach to pgadmin container's terminal:

$ docker exec -it pgadmin /bin/sh
/pgadmin4 # ls -la
...

/var/lib/pgadmin/storage/test_example.com # ls
my_table_export.csv
/var/lib/pgadmin/storage/test_example.com # cat my_table.csv 


How to check pgAdmin4 log file?


Path to pgAdmin log file on Linux is: ~/.pgadmin/pgadmin4.log [FAQ]


Sunday 2 February 2020

Debugging C++ program in VSCode on Linux

Let's assume we have VSCode running in Ubuntu 18.04 and the following project structure:

cpp-demo/
cpp-demo/main.cpp
cpp-demo/src/foo.cpp
cpp-demo/include/foo.hpp


Let's assume we want to name the build output cpp-demo and place it at project's root directory:

cpp-demo/cpp-demo


To build and debug it we need to have

cpp-demo/.vscode/tasks.json
cpp-demo/.vscode/launch.json


Building


tasks.json contains build instructions. From the main menu (CTRL+SHIFT+P), choose Tasks: Configure Default Build Task and then g++ build active file. This will create a /.vscode/tasks.json file and open it in the editor. A task will be created there and we need to edit it like this:


cpp-demo/.vscode/tasks.json:


{
    "tasks": [
        {
            "type": "shell",
            "label": "g++ build active file",
            "command": "/usr/bin/g++",
            "args": [
                "-g",
                "${workspaceFolder}/main.cpp",
                "${workspaceFolder}/src/*.cpp",
                "-I",
                "${workspaceFolder}/include",
                "-o",
                "${workspaceFolder}/cpp-demo"
            ],
            "options": {
                "cwd": "/usr/bin"
            },
            "group": {
                "kind": "build",
                "isDefault": true
            }
        }
    ],
    "version": "2.0.0"
}

To run the build task defined in tasks.json, press Ctrl+Shift+B or from the main menu choose Tasks: Run Build Task. This will run g++ compiler and create the output binary. To run it, open a new terminal (in VSCode) and run:

./cpp-demo

For the full list of variables used in VSCode configuration files see Visual Studio Code Variables Reference and visual studio code - VSCode environment variables besides ${workspaceRoot} - Stack Overflow.


If we want g++ to have verbose output we can add to list of arguments:

"-v"

If we want linker to create map files (where we can see all mangled names of functions):

"-Xlinker",
"-Map=${workspaceFolder}/output.map",

Debugging


launch.json contains debugger settings.  From the main menu, choose Debug: Add Configuration... and then choose C++ (GDB/LLDB). You'll then see a dropdown for various predefined debugging configurations. Choose g++ build and debug active file. This creates a launch.json file and opens it in the editor. We need to edit it a bit e.g. to set correct name of the binary in program:

cpp-demo/.vscode/launch.json:

{
    // Use IntelliSense to learn about possible attributes.
    // Hover to view descriptions of existing attributes.
    // For more information, visit: https://go.microsoft.com/fwlink/?linkid=830387
    "version": "0.2.0",
    "configurations": [
        {
            "name": "g++ build and debug active file",
            "type": "cppdbg",
            "request": "launch",
            "program": "${workspaceFolder}/cpp-demo",
            "args": [],
            "stopAtEntry": true,
            "cwd": "${workspaceFolder}",
            "environment": [],
            "externalConsole": false,
            "MIMode": "gdb",
            "setupCommands": [
                {
                    "description": "Enable pretty-printing for gdb",
                    "text": "-enable-pretty-printing",
                    "ignoreFailures": true
                }
            ],
            "preLaunchTask": "g++ build active file",
            "miDebuggerPath": "/usr/bin/gdb"
        }
    ]
}

Current working folder (the one opened in VSCode, cpp-demo in our case) is workspace so ${workspaceFolder} contains path to it.

To start debugging, place some breakpoints in source code, press F5 or from the main menu choose Debug: Start Debugging


References:


Get Started with C++ and Mingw-w64 in Visual Studio Code
Get Started with C++ and Windows Subsystem for Linux in Visual Studio Code
Configure launch.json for C/C++ debugging in Visual Studio Code
"g++" and "c++" compiler - Stack Overflow
c++ - What is the difference between g++ and gcc? - Stack Overflow
Compiling with g++