- General purpose - for common workloads
- Compute optimized - for workloads that require high-performance CPU
- Memory optimized - for fast data processing
- t2.nano: 1, 0.5
- t2.micro: 1, 1
- t2.small: 1, 2
- t2.medium: 2, 4
- t2.large: 2, 8
- t2.xlarge: 4, 16
- t2.2xlarge: 8, 32
Storage device for these instances is provided by another AWS service called EBS (Elastic Block Storage). They are selected before provisioning the EC2 instance but can also be attached after provisioning. There are several types of EBS Volumes:
- io1: SSD, for business-critical applications
- io2: SSD, for latency-sensitive transactional workloads
- gp2: SSD, general purpose
- st1: HDD, low-cost HDD, frequently accessed, throughput-intensive workloads
- sc1: HDD, lowest cost HDD volume, for not so frequently accessed workloads
Having a hard disk storage attached to EC2 instance means we can install and run custom applications (user data) upon the instance launch. E.g. if we want to install and run Nginx upon launch of the Ubuntu server we can pass and execute the following shell script:
In case of instances with Windows OS, we can pass PowerShell (.ps) or batch (.bat) scripts.
EC2 instance access upon deployment:
- Linux: SSH key pair
- Windows: remote desktop or RDP with username/password
How to provision EC2 instance using AWS Management Console
- Choose AMI (e.g. Ubuntu server)
- Choose the instance type (e.g. t2.micro)
- Configure the instance
- Number of instances
- Purchasing option
- Network
- e.g. default VPC which is automatically created for this region. VPC is like an isolated private network with only AWS infrastructure in it.
- Subnet
- e.g. default subnet
- Auto-assign public IP
- Placement group
- Capacity reservation
- Domain join directory
- IAM role
- CPU options
- Shutdown behaviour
- Stop-hibernate behaviour
- Enable termination protection
- Monitoring
- Tenancy
- Credit specification
- File system
- Metadata accessible
- Metadata version
- Metadata token response hop limit
- User data
- choose if it comes as text or as file e.g. if it comes as text we can copy to the available text box the content of our bash script from above
- [checkbox] input is already base64 encoded
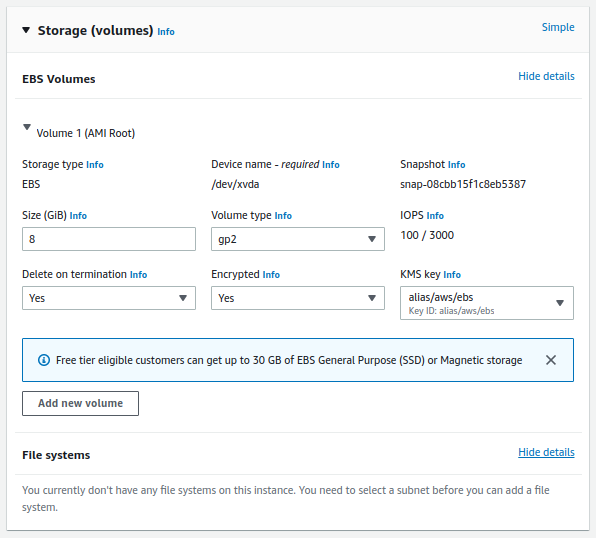
- Add storage
- choose default volume
- Volume type: root
- device: /dev/sda1
- snapshot: snap-0123456789
- size (GiB): 8
- Volume type: General Purpose SSD (gp2)
- IOPS: 100/3000
- Throughput (MB/s)
- [checkbox] delete on termination
- Encryption
- Add New Volume
- Add tags
- e.g. Key "Name" and Value "webserver"
- Configure Security Group. This is a set of firewall rules that control traffic to/from the instance.
- Create new security group
- Name e.g. ssh-access
- Description e.g. SSH access to my web server
- Type e.g. SSH. All types are:
- Custom TCP Rule
- Custom UDP Rule
- Custom ICMP Rule - IPv4
- Custom ICMP Rule - IPv6
- Custom Protocol
- All TCP
- All UD
- All ICMP - IPv4
- All ICMP - IPv6
- All traffic
- SSH
- SMTP
- DNS (UDP)
- DNS (TCP)
- HTTP
- POP3
- IMAP
- LDAP
- HTTPS
- SMB
- Protocol e.g. TCP
- Port range e.g. 22
- Source e.g. custom, 0.0.0.0/0 (this source allows all IP addresses to access the instance; it's often better to allow only traffic from known IP addresses or ranges)
- Description e.g. SSH for my web server
- Select an existing security group
- Review Instance Launch
- click on the Launch button => a dialog opens "Select an existing key pair or create a new key pair"
- A key pair consists of a public key that AWS stores and a private key file that we store. Together, they allow a secure connection to our instance. For Windows AMIs, the private key file is required to obtain the password used to log into our instance. For Linux AMIs, the private key file allows to securely SSH to our instance.
- We can choose an existing key pair or create a new one
- If we create a new one, we need to click on button "Download Key Pair". We need to download the private key file (e.g. my-webserver.pem) and store it at a secure location. It is NOT possible to download this file later!
- Click on the button "Launch Instances"
If we select the instance, we can see its:
- Details
- ID
- state
- type
- public IPv4 address
- public IPv4 DNS
- private IPv4 addresses
- private IPv4 DNS
- VPC ID
- Security
- IAM Role
- Security groups
- Networking
- public IPv4 address
- public IPv4 DNS
- private IPv4 addresses
- private IPv4 DNS
- VPC ID
- Subnet ID
- Storage
- Root device details
- name e.g. /dev/sda1
- type e.g. EBS. Root device type is actually set in AMI specs. When launching EC2 instance it is enough to specify AMI, with no need to specify root storage.
- EBS optimization (enabled or disabled)
- Status Checks
- Monitoring
- Tags
The whole process currently looks like in the following images:
Compare instance types opens the following dialog:
Configure storage Advanced expands that section to:
How to SSH to EC2 Instance from Linux Terminal
Each Linux instance launches with a default Linux system user account. The default user name is determined by the AMI that was specified when you launched the instance.
For Amazon Linux 2 or the Amazon Linux AMI, the user name is ec2-user.
Last login: Wed Mar 23 23:31:18 2022 from example.com
__| __|_ )
_| ( / Amazon Linux 2 AMI
___|\___|___|
https://aws.amazon.com/amazon-linux-2/
41 package(s) needed for security, out of 72 available
Run "sudo yum update" to apply all updates.
[ec2-user@ip-10-1-4-59 ~]$


No comments:
Post a Comment